Shopify is an attractive tool for e-commerce beginners looking to launch their first online store. However, as your business grows and you gain experience, other more robust e-commerce platforms such as WooCommerce become more attractive. WordPress based WooCommerce stores allow users to free themselves from many of Shopify’s limitations and reduce the cost of running an online store. In this post, we’ll give you a complete guide on how to migrate your Shopify Store to WooCommerce on a WordPress website.
Struggling with Shopify? Check out this guide on Shopify to WooCommerce, the widely loved shopping cart for WordPress, migration. Share on XIs WooCommerce The Best Choice For You?
Shopify and WooCommerce are among the most popular e-commerce solutions. Currently, over one million businesses use Shopify for their online stores and there are over 5 million WooCommerce active downloads. Undoubtedly, both of these platforms have a lot to offer, but when it comes to platform flexibility Shopify does have some shortcomings.
First-time online store creators are drawn to Shopify because it is one of the most user-friendly tools you can use. All you need to do to set up your e-shop is to create an account, choose a theme, and directly purchase a domain through their platform. On the other hand, initial set-up for a WooCommerce site requires finding hosting, purchasing a domain, setting up a WordPress site, and configuring the WooCommerce plugin. Additionally, when you run a WooCommerce store on a WordPress site you are directly responsible for site maintenance and protection.

As time goes by and your business grows, Shopify can become increasingly expensive, with advanced features being priced at $299 dollars a month. Additionally, Shopify charges a commission for all external payment gateways and allows for only limited product variations. Not handling your own hosting, while simpler, also comes at a price, since your online store data is controlled by Shopify servers.
WooCommerce, on the other hand, runs on WordPress, giving you total control over your website and online store. Website theme options and plugins are abundant allowing you to add countless features and fully customize your website to your needs. WooCommerce sites can be scaled immensely without requiring you to move up to a more expensive monthly plan for advanced features.
Overall, if you can get over the higher learning curve and learn how to set up a WordPress site, WooCommerce has many advantages for any online business. You can easily change the design of your site, add new functions with plugins, and use a wide range of electronic payment gateways. Additionally, with a WordPress site, you can build up your site to include many other useful customer pages such as forums and blog posts. The flexibility, scalability, and growth you can achieve with WooCommerce are unparalleled.

Preparing For Shopify To WooCommerce Migration
Backing up data
The first thing you need to do to migrate from Shopify to WooCommerce is to back up all your online store data. For data backups, you can export different types of store information including products, customers, orders, gift card codes, discount codes, and financial data in CSV file format. This step is extremely important if you are planning on a manual WooCommerce migration, but it is also useful to help you safely store data throughout the entire process.
To export your Shopify store products, follow these instructions:
- From your Shopify admin, go to Products
- Click on Export
- Choose which products you want to export. If you want to export all product data, select All Products.
- Select which type of CSV file you want to export your data to.
- Click on export products.
- Take note that if more than 50 products are exported, the CSV file will be emailed to you. Less than 50 products can be downloaded as a CSV file directly from the browser.
For a detailed step-by-step tutorial on how to back up and export other Shopify data, take a look at this documentation on exporting customers, orders, and discount codes.
Installing WooCommerce
The first thing you will need to do to set up a WooCommerce store is to set up a WordPress.org site. To do this you will first need to get a website hosting plan and purchase a domain for your new site. Next, you’ll need to select a theme for your Website’s design. You can choose from a wide library of both free and paid template options.
Once your site is set up, follow these steps to install the WooCommerce plugin:
- Download the WooCommerce plugin file.

- From the WordPress admin dashboard, go to Plugins and select Add New.
- Click on the Upload Plugin, select the WooCommerce plugin zip file and click on Install.
- Activate the plugin.
- A WooCommerce menu will be added to your WordPress dashboard.

Manual Shopify Migration
Product Import
Once you have installed WooCommerce and configured some general store settings, you can start importing your Shopify online store product data. This can be done manually or with the help of third-party extensions or professional migration service providers. Manual product migration can require more effort than the latter approaches but it has the advantage of being completely free.
To manually import all data into WooCommerce on your own follow these instructions:
- From the WordPress dashboard and select Products.
- Click on Import to find the built-in product CSV importer.

- Next to “Choose a CSV file from your computer” click on Choose File.

- Select the CSV product file you exported from Shopify.
- Next, you’ll see a Column Mapping Screen. WooCommerce will automatically try to match data in the file to WooCommerce product fields. If necessary, use the drop-down menus on each row to correct mapping.
- Select Run the Importer and wait for the import to finalize.
Importing Customers, Orders, and Coupons
Unlike product data, which can be imported directly into WooCommerce using their own built-in importer, you’ll need to get a CSV importing extension or plugin to import your customer, order, and coupon data. There are free and paid plugin options you can use for this purpose.
Below we will be showing you how to import two of these data types into your WooCommerce store with a free plugin, Order Export and Order Import for WooCommerce. To import these types of data into your WooCommerce store, follow these steps:
- Get started by downloading the Order Export and Order Import for WooCommerce from the WordPress Directory. (You can also find it using the search bar located in by clicking on Plugins and then Add New.)

- From the WordPress dashboard, navigate to Plugins and select Add New.
- Click on Upload Plugin and select the new plugin file. Click on Install Now.
- After installation finalizes, click on Activate.
- Once active, a new menu titled “Order Imp-Exp” and “Coupons Imp-Exp” will be added under WooCommerce on the dashboard.
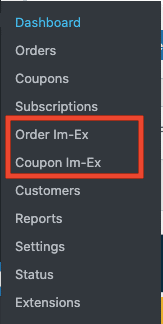
- To import an order click on “Order Imp-Exp” and go the Orders Import/Export tab.
- Click on the Import button.

- Select the CSV order file and upload it.
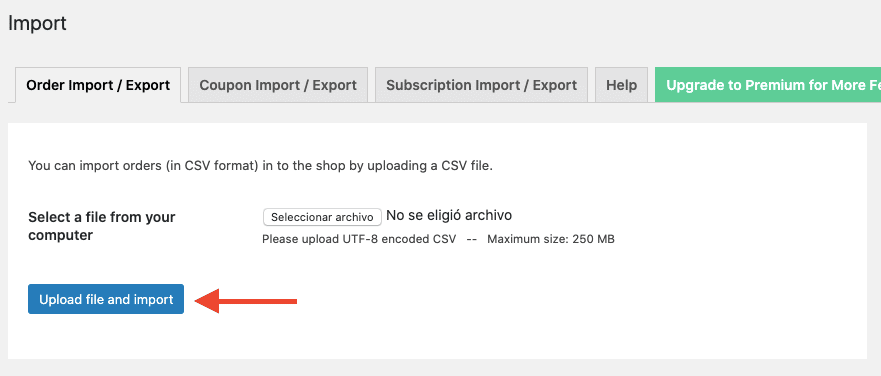
- To import coupons click on “Coupons Imp-Exp” which will show you the Coupons Import/Export tab.
- Click on the import button.

- Select the coupon CSV file and upload it.

Keep in mind that this free plugin doesn’t have an option to import customers from a CSV. You will need an additional plugin to provide this function.
Another option is you could use is the Customer, Order, and Coupon CSV Import Suite Extension sold at the WooCommerce Marketplace. This premium extension will allow you to migrate the different data sets from your Shopify into WooCommerce. Unlike the free plugin mentioned before, this plugin also allows you to import users or customers from a CSV file.
- Download the Customer/Order/Coupon CSV Import Suite Extension from the WooCommerce Extension Marketplace.
- Install and activate the plugin. A new menu titled CSV Import Suite will be added under WooCommerce on the dashboard.
- Click on CSV Import Suite from the dashboard and go to the Import tab.
- Click on the Import Customers button located under the Import Customer CSV section to import customers, Import Orders button located under the Import Order CSV section, or Import Coupons button located under the Import Coupon CSV section.
- Next, you will be asked to select from where do you want to import your customer data. Select the CSV or tab-determined text file option to use CSV files exported directly from Shopify. Click Next.
- Select the Customer CSV file from your computer. On the next page, you’ll be able to preview import data. Here you can confirm the information is correctly set up. Click on Next and then click on Start Import.
Before completing the import process above, use a plugin to disable emails on your WordPress site to prevent customers from receiving any email notifications about previous orders you are currently importing to your new WooCommerce store. You can also disable email notifications directly from WooCommerce settings.
Shopify To WooCommerce Migration Using Extensions Or Professional Services
Shopping cart migration plugins are a good option for those looking for a middle ground between manual migration and hiring a professional team to migrate your Shopify store to WordPress and WooCommerce. These plugins help you complete migrations in a simple way and come at a lower cost than professional migration services. On the other hand, those that don’t want to do any work themselves or have a large or complex store setup might benefit from outsourcing the process to professionals.
Cart2Cart
Cart2Cart is a plugin used to migrate online stores between a diverse selection of e-commerce platforms including Shopify and WooCommerce. You can use this plugin’s short process to migrate all the data of your Shopify store to WooCommerce. Supported data includes products, product categories, manufacturers, customers, orders, coupons, and even blogs. Some additional options allow you to create 301 redirects, migrate SEO URLs, and preserve order IDs on your new WooCommerce store.
To migrate from Shopify to WooCommerce using Cart 2 Cart, follow these steps:
- Create a Cart2Cart account
- Select Shopify as your “source cart”. You’ll need to provide your Shopify URL and API.

- Next, select WooCommerce as your “target cart”. you’ll need to provide your WooCommerce store URL.

- To establish the connection install the “Connection Bridge”. Installation can be manual or automated.
- Next, select the data types you want to import.
- Finally launch migration.
This service also allows you to migrate online store content from a CSV file into your new WooCommerce store.
Next-Cart
Next-Cart is another shopping cart migration tool that allows you to migrate products, customers, orders, categories, reviews, and other e-shop data from Shopify to WooCommerce. The migration process is simple and very similar to the one you would follow with other migration tools.
To migrate from Shopify to WooCommerce using Next-Cart, follow these instructions:
- Set Shopify as the “source cart” and provide additional information on your Shopify account.

- Next, set WooCommerce as the “target cart” and add the corresponding URL.

- Download the Kitconnect package file and upload it to the store root folder.
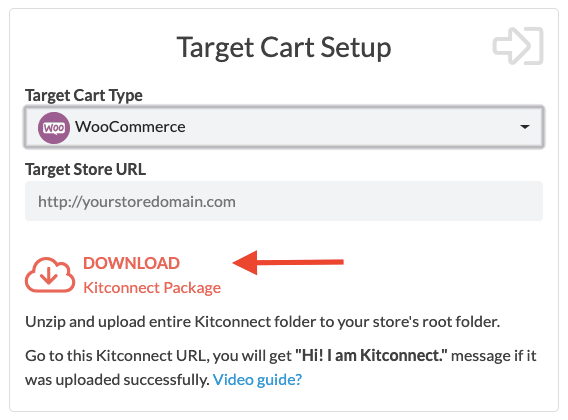
- Select all of the data you want to import into your target site.
- Confirm settings and perform full migration.
As an additional alternative, you can check out S2W – Import Shopify to WooCommerce, which is a plugin you can use for shopping cart migration between these two platforms. This plugin uses your Shopify API key to transfer data including store settings, shipping zones, taxes, pages, blogs, coupons, customers, products, orders from Shopify to WooCommerce store directly. The free version of this plugin can help you import all of your products to WooCommerce, while the paid version gives you access to migration features for customer, order, coupons, and other data.
Canceling Shopify
Once all your online store’s data has been successfully imported into your new site and are ready to cease Shopify operations, you’ll need to delete your old Shopify e-commerce site. The first step you should take, before actually closing down your account, is to cancel all third party apps used in your store. This will prevent these third-party apps to continue billing you for their products after your Shopify store is canceled. If you have any outstanding or pending charges, these will need to be paid in full before you are able to close down your account.
Migrating Your Shopify Store Domain To WordPress
It is also important that you cancel your Shopify domain or migrate your domain to your new website. If you have already build up an audience and customer base with your current domain, keeping it is important to avoid confusion among your customers. Since Shopify directly manages domains and hosting for their users, you’ll need to export the domain from your current Shopify site in order to use it elsewhere.

Shopify sources domains from OpenSRS so in order to transfer your domain you first have to access your OpenSRS account. From your account, you’ll need to disable the “Domain Locking” option and then copy the domain authorization code located in the Domain extras tab. To complete domain migration, the next specific steps to take can vary depending on your hosting provider. Your hosting provider can give you clear instructions on what steps to follow next.
If you simply want to delete your Shopify domain and don’t plan on using it anymore, you can delete it by navigating to the domain section of the online store area in the admin menu and click on the delete button next to your current domain.
Canceling And Closing Your Shopify Store
Once you completed the steps above you can finalize the cancellation process and close down your Shopify store.

To actually complete cancellation of your Shopify account, log into the Shopify store owner account and follow these instructions:
- From the Shopify admin, navigate to Settings.
- Go to Account and switch the settings to Single Sign-On.
- Next, go to Plans and Permissions from the main Settings menu and scroll down to the Store Status section. Click on Close Store.
- Enter your password in the pop-up window and click Confirm.
- On a second pop-up window, select a reason for closing your Shopify store from the drop-down and click on the Close Store button.
For additional guidance, you can refer to Shopify’s video tutorial below.
https://www.youtube.com/watch?v=1OBLC8gqrBc
Conclusion
We hope this post provided you with valuable information on the different methods to migrate from Shopify to WooCommerce. If you tried any of the tips above, please tell us about your experience. If you run into any issues or have additional questions, please let us know in the comments below. For more help with your WooCommerce store, contact us to learn about our WooCommerce services.
